Monday, January 31, 2011

Freezer Meal Night

My sisters, momma and I with (1) family's meals from the night
I mentioned that I did another freezer meal night with my sisters and mother dear the other night.  It required a lot of prep work and planning (I was in charge of it this go around) but was so worth it.  I have had several people ask for the recipes we used, and how we do this.  My sister Ali started the tradition for us several months ago and this was only our second go around, so by no means do I claim to be an expert on the subject.  Overall though, we've had some really yummy meals and I think we did pretty well with planning the right amounts (with the exception of our French Dip Sandwiches...kind of a laughing matter for us the whole night actually). 

Today I will post how to plan and prepare for your own freezer meal event, and over the next week or so will post the recipes we used.

First, select your recipes:
We have made (10) different recipes each time we've done this.  It's worked well for us.  Several of them make large amounts, so some of us opted to divide several of our meals into two nights worth.  We also tried our best to get a variety of recipes (mexican, italian, soup, sandwiches, etc etc).

Multiply your recipes and divide up shopping list:
This was actually the most time consuming part.  Several of the recipes make a ton of food, so often times we only multiplied an original recipe by 3 for example, instead of (5) for all 5 of our families.  Next, I typed up the list of all ingredients with specific instructions for how they needed to be prepared (i.e 4.5 cups chopped onions, or 5 lbs ground beef, browned).  I divvied up the list amongst the 5 of us, making sure to give each ingredient that was duplicated on several recipes to only one person, so that we could buy in bulk and save on cost.  I also had to keep in mind what grocery items had more major prep work, and was careful to divide that up evenly so that one person wasn't stuck with preparing all the meat for example, or grating all the cheese.

Shop!
Each of us purchased our assigned ingredients (looking first for the best deal of course) and made sure to keep our receipts to reimburse one another at the end. Perhaps the greatest part about buying everything in such large quantities is how much money you save.  We averaged about $5-$6 PER MEAL for our whole family.  Eat that, Little Caesers!

Prepare your assignments at home:
When I sent out the lists to each person, I gave them assignments for any prep work that needed to be done.  We try to do as much of the time consuming work at home (or anything that needs to slow cook) so that we can simply assemble the rest when we are together.  Some of the prep work that went on this time around was:  peeling and cutting veggies, chopping LOTS of onions, grating cheese, browning ground beef, slow cooking beef with other ingredients for enchiladas, and slow cooking beef for french dip sandwiches.

The Main Event- Freezer Night:
We all met at my moms house and began the mayhem.  Each of us in addition to our food assignments brought:
  • A large cooler (to bring our food in and to take our finished meals home in)
  • Our own bags of gallon sized and quart sized freezer bags
  • Our own plastic wrap, aluminum foil, and cooking spray
  • Our own casserole dishes (as specified per recipes)
  • Our assigned pots/pans, mixing bowls, utensils, knives etc as needed per recipes
We set up two tables to work on.  A prep table for food, and a "packing" table where we laid out our "stuff" assembly line style so we could keep track of whose items were where and quickly prepare each person's dishes/ bags as needed.  This worked really well for us as often times one person got all of the bags or dishes ready instead of everyone stopping what they were doing to prepare their own items.

Assembly line table for packaging

Prep table

We organized the recipes based on the amount of time/work required.  We started first with the more difficult/time consuming recipes.  We worked best with two people working together on one task at hand.  Once one recipe was completed, it went into the bag or dish, was labeled with a sharpie, and put into the coolers.

Recipes sorted into piles: fast, medium, time consuming
*** A very critical part of the night for us is ordering in chinese.  You can't imagine how hard it is to smell the wonderful aromas on a hungry belly.  The last thing we wanted to do was prepare another meal for us to eat that night... Chinese it is! ****

Label frozen meals with instructions, or print out an instruction sheet that you have handy for serving your meals:
I'd say that header is pretty self explanatory :)


Overall, our evening lasted about 5 hours this time around (which was pretty fast for us- the first one was about 6-7 hours).  It is a lot of work but so worth the effort to have delicious home cooked meals ready at your fingertips.  We have decided to keep this a quarterly tradition.  Considering that I've already used 2 of my meals over the last week, it looks like I may be in trouble. :)

Recipes you can look forward to shortly:
  • Mini Meatballs
  • Leftover Baked Potato Soup
  • Shredded Beef Enchiladas
  • Chicken Noodle Soup
  • French Dip Sandwiches
  • Peanut Curried Chicken
  • Penny Wenny's Creamy Salsa Chicken
  • Lasagna
  • Beef Stew
  • Stromboli


~ PW

Wednesday, January 26, 2011

Thomasville Dresser Reveal

SOLD!

I am proud to reveal one of my most exciting projects to date.  This involved several more hours and labor than I had anticipated but I am in LOVE with the end result.  Once again, I wish I had a place for it in my home...

After much sanding, painting, painting again, staining, more sanding, glazing, wallpapering and more painting, here she is:


 Please forgive the background... this baby is WAY to big to move out of my garage for a photo shoot :)


I love the way the dark stain brought out the color variations in the natural wood.  The imperfections are what makes this piece so perfect!


Don't worry- those screws will be cut down by my sweets manana...


Legitimate Thomasville piece
Ooops...the  inside of the drawers haven't been cleaned out yet.  You'll forgive me, won't you? 


This is the lucky knob I found hiding behind the top drawer with a cute little gold clutch (no, there weren't any Benjamins in there as many of you may be wondering... I wish)


So there she is.  Let me quickly remind you what we began with:

Before

I really believe that anything with the right amount of elbow grease and some serious TLC can be beautiful again.

After


If you are interested in purchasing this for your home, please email me:  LittleMissPennyWenny@gmail(dot)com for pricing.  I am also willing to deliver to your home for a fee. 

SOLD!

I will be posting the tutorial on how this look was achieved shortly.  Also, my sisters and momma and I had our quarterly Freezer Meal Night this past weekend and made lots of fabulous dishes to store in our freezers for quick meals at our fingertips.  I will be posting our recipes and pictures soon.  Stay tuned!

~PW


I'm linking up to The Shabby Chic Cottage this week.

Sunday, January 23, 2011

Peanut Butter Rice Krispie Treats/ Dresser sneak peak

First, I have to give you a little sneak peak on the dresser's progress.  I am already in LOVE and she isn't completely finished yet.  Wait till you see her with hardware... I was a good girl and took lots of pics along the way to show how I created this look.

 More details and a tutorial on that coming soon...  On to the sugar :)

A favorite treat that I often make for parties or events that is super fast and easy to make is Peanut Butter Rice Krispie Treats.  They're much fancier looking (and tasting) than the original recipe, but kids love them too.  Enjoy!
Peanut Butter Rice Krispie Treats


Ingredients:

1 cup peanut butter (I prefer chunky)
1 cup sugar
1 cup Karo syrup
5 cups Rice Krispies (cheap generic brands work just as well)

1 cup milk chocolate chips (or dark)
1 cup butterscotch chips

Directions:

Measure out rice krispies into a large bowl.  In a small saucepan, stir peanut butter, sugar and Karo syrup over medium heat until smooth. 
Pour mixture over rice krispies, stir gently till all krispies are coated. 


Pour into a lightly greased 9x13 pan and press down with buttered hands to flatten it all out evenly. 

In a small glass bowl combine chocolate and butterscotch chips, microwave for aprox. 2 minutes, stirring halfway (Do not overcook- you only want them to melt.  Otherwise they will start to harden and crumble.) 

When chips have completely melted, pour over the rice krispie mixture, and spread out with a spatula. 


Once cooled, cut into servings and try to share with your friends.  If you end up eating the whole pan by yourself like I unfortunately have on many occasions, feel guilty about it for approx 4 minutes, forgive yourself and move on with your day.  :)


Last but not least I had to share the funniest video of my Trav.  I was choreographing the other day in our living room and he loves  to join me whenever I dance.  This particular one is a super fast jazz dance so it involved lots of turns and going to the ground.  Here is his version of the piece we choreographed together:


~ PW 

Thursday, January 20, 2011

Dresser kicked to the curb

This poor dresser was literally kicked to the curb by its owner.  I happened to drive down my mom's street several months ago and did a double take when I saw this giant block of wood in someone's gutter.  I didn't think much of it but decided that on my way home I had to at least see what it was.  I hit the jackpot.  Sitting outside waiting to be picked up by the city (it was their street cleanup week) was this HUGE solid wood Thomasville dresser with all drawers intact, and (2) of the original knobs still there and gorgeous.  I happened to be rollin' in my sweets' truck that night so I am certain the stars were aligned for me and I was meant to own this beast dresser.   Fortunately my dad helped me load this heavy thing into the truck and homeward bound I went.  This has been sitting in my garage for months and I have finally had the urge again to start a new project.

I know that I openly admitted that my New Year's resolution is to finish each project before I start another.  My defense here is that I truly can't move forward (much) on my Wingback chair until I buy new foam (and figure out how to wrap it in down) which requires some extra $$$ that I don't have right now.  SOOO Penny Wenny's plan is to take an itsy bitsy detour onto the dresser, sell it and make some $$$ to pay for the materials needed to finish my chair.  Does that count?  I sure hope so.  :)

Without further adieu, may I introduce you to the Beast:

The drawers in these pics are in the wrong places- both on the right side are tops, and both on the left are the bottoms


I love these little knobs!


I have big plans for this baby.  Although it may be difficult for many of you to envision her future charm, if you have need for a new dresser and would like me to refinish this piece for your room, please contact me!


As a side note, my dear friend gave me this gorgeous bed cover (I can't remember the proper name for it) but I LOVE the texture and of course that it is white.  She knows me too well.  This very well may be transformed into a duvet cover for my new master bedroom.  Eeeek!  Thank you Kathie. :) 


~ PW

Monday, January 17, 2011

Mrs. Field's Copycat Oatmeal Cookies

Have you ever wished you could eat clam chowder without the clams, or chocolate chip cookies without the chocolate chips?  I used to beg my mom for each of those as a kid (to name a few).  I don't like clams (at all) and I don't love chocolate (yes I know- everyone in the world thinks this is insane).  I just always felt like the chocolate flavor overpowered the cookie.  I was ecstatic when my sister Amanda first introduced us all to this copycat Mrs. Field's Oatmeal Cookie recipe.  It's made with oatmeal, but has a totally different texture because the oats are blended. 


There are many versions of this out there that add grated hershey bar, chocolate chips, nuts, and coconut flakes.  Don't get me wrong, those are all fabulous ingredients and I make several cookie recipes with the same ingredients.  However, there is something so delicious about the simplicity of this cookie.  It tastes so good by itself that it really just doesn't even need all of the extras.  They are sweet, buttery, and chewy.  I must warn you that they are also extremely addicting.  I hope you love them as much as I do.

Mrs. Field's Copycat Oatmeal Cookies

Ingredients

picture shows ingredients for a half recipe- you will need two eggs and two cubes of butter... and pretend the coconut flakes aren't there since I just went off about not using them.  Sometimes they are fun for an added flavor and texture but I usually don't use them.  The rest of the pictures don't include the coconut flakes.
2 cups flour
1 tsp baking soda
1 cup melted butter
1 1/2 cups sugar
1 tsp vanilla
2 eggs
2 1/2 cups oatmeal

Directions
Preheat oven to 325 degrees.  Blend oatmeal until it turns into a thick powder, approximately 1 cup at a time; set aside. 

Cream butter and sugar in Bosch or electric mixer. 

                                      
Add eggs, one at a time beating well. 

Mix in dry ingredients, mix well. 


Roll into tablespoon size balls and place on lightly greased cookie sheet, approximately 12 per sheet. 

Bake for approximately 10 minutes.  You don't want these to turn golden.  They are the best when they are still soft and chewy.  Over baking makes them crunchy and hard.


Enjoy with a tall glass of milk (I won't blame you for drinking whole milk if you ran out of 1% and had no other choice but to drink your toddler's milk... I, on the other hand would never do such a thing).


~PW

P.S.
This darling Polo Ralph Lauren shirt was a $2 steal I found at my local DI this week.  It is in perfect condition.  He wasn't thrilled about modeling it before church but you get the idea...


I sure love that little stinker boy.

Sunday, January 16, 2011

Inspiration for Master Bedroom Makeover

I have overused my excuse that we are still in the process of "moving in" to explain my sad bedroom situation.  I guess I need to accept that now, after living in our home for over 8 months we are as moved in as we're ever gonna be.  The bedroom situation has got to change.  I haven't really done anything to decorate yet because I didn't want to just throw things up because I had them; I really wanted to make our bedroom a place that I love and am proud of.  I have been working slowly on collecting components that will make up my bedroom makeover, but have been stuck for quite some time on color choices.  Currently, my bedroom walls are a deep grey/blue color (cargo from Kwal Howell).  I loved the color when I first chose it and was planning on accenting our bedroom with black and white/cream (hence the fabric choice for my wingback chair).  Since we've been here though it just hasn't seemed to sit well with me.  I assumed it was just because all of my furniture and accessories weren't finished and that it would look great with the accents.  Anyway after brewing over this for months it finally occurred to me that it would be ridiculous to "make things work" and decorate a room around a color scheme that I really don't even want!  I decided to wipe the slate clean.  With no pre-determined requirements, I started saving pictures of any bedrooms/ bedroom components that I loved.  My guess is that you will realize much more quickly than I did what color scheme/ style I am going for in my bedroom and what the most important (and simple) change is that I need to make.

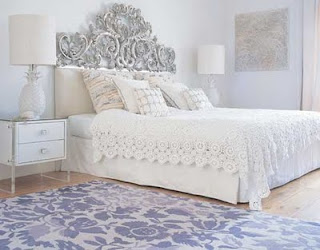
I loved several things in this room:
1) the gorgeous linen headboard
2) the antiqued silver night stand with fabulous elegant legs
3) the assortment of accent pillows in a fairly monochromatic color scheme
4) the neutral bedding

What I didn't love:
1) the intensity of the wallpaper (too feminine for a bedroom shared by a man and woman in my opinion) and overwhelming on all walls.
 What I love:
1) the clean white lamps with clean white lampshades
2) the pale blue/ gray walls
3) vintagey white night stands
4) monochromatic neutral bedding with lots of accent pillows
5) Let's not forget the obvious here: the gorgeous (and super expensive I am sure) headboard accent and cream linen headboard
6) What I think I see peeping out from the side- clean white curtains

What I don't love:
1) Walls are a tich too blue/ almost purple


What I love:                                                                        
1) the GORGEOUS tufted linen headboard                    
2) the monochromatic neutral bedding in clean white and soft creams/ tans
3) the gorgeous french provincial night stand in a soft grey/ silver finish
4) the clean white curtains
5) neutral cream lamp and lampshade
6) the pale tone to the walls  

What I don't love:
1) walls are too purple in color
2) the chandelier- don't get me wrong, I LOVE chandeliers and particularly feminine glass/ crystal chandeliers but this one just rubs me the wrong way for some reason...

 
Are we starting to see a theme here?
 
Here are some pictures that include components I would like to see in my bedroom (though I may not particularly love the bedroom as a whole).


Mirrored night stand, grey/ light blue color scheme


White chair rail and decorative molding boxes, clean white bedding


soft grey walls, clean neutral bedding 

SOOO here is what it took Penny Wenny 8 months to realize:
  • I don't want dark walls! 
  • I like a monochromatic color scheme
  • I love my "clean" whites and "creamy" creams
  • I love elegant lines on furniture
  • I love mirrors on night stands
  • I love neutral linen tufted headboards
  • I LOVE molding
Finally I know exactly how I want this room to look and I have come up with a game plan on a thrifty gal's budget using as many of my own components as possible.  First, I need to paint!  Buh-bye dark blue, hello soft grey.  Second, my sweets and I will install chair rail and decorative molding... eeek!  I can hardly contain my excitement about this one because it took much convincing on my behalf for him to realize how gorgeous molding is and that it doesn't only belong in museums. Silly boy. Lastly, and quite possibly the most fun part- furniture and decorating! Fortunately I already have most of the furniture and accent pieces that are going to make my bedroom the sanctuary that I want it to be.  It's just a matter of painting and refinishing them to the color and style that I want.  I can't wait to show you what I have pulled up my sleeve!  Hopefully we don't all have to wait another 8 months for me to reveal this exciting transformation.  

Ladies and gentlemen, bring on the paint.