Hey there, friends. Thank you so much for all your kind words on the
dining room set I recently transformed. It was such a gratifying project to have completed after the long hours I spent working on it.
In this tutorial I will share the steps I took to transform this set from the dated set it once was.
For those of you reading who don't already transform furniture of your own, I encourage you to learn! My primary reason for beginning to do this was because I couldn't afford the furniture I really wanted, so I tried to make pieces that looked nice but didn't come with the hefty price tags. As I began to do so, I realized how much I loved it and wanted to continue for a creative outlet and hobby in addition to helping me decorate my house on a tight budget. You may discover that it's not for you and you don't enjoy doing it at all. If so, then at least you can say you tried and you don't need to feel at all bad about buying your furniture from a store, already finished just the way you like it. (I might just envy you a little bit for it.)
Off my soapbox now and on to the tutorial.
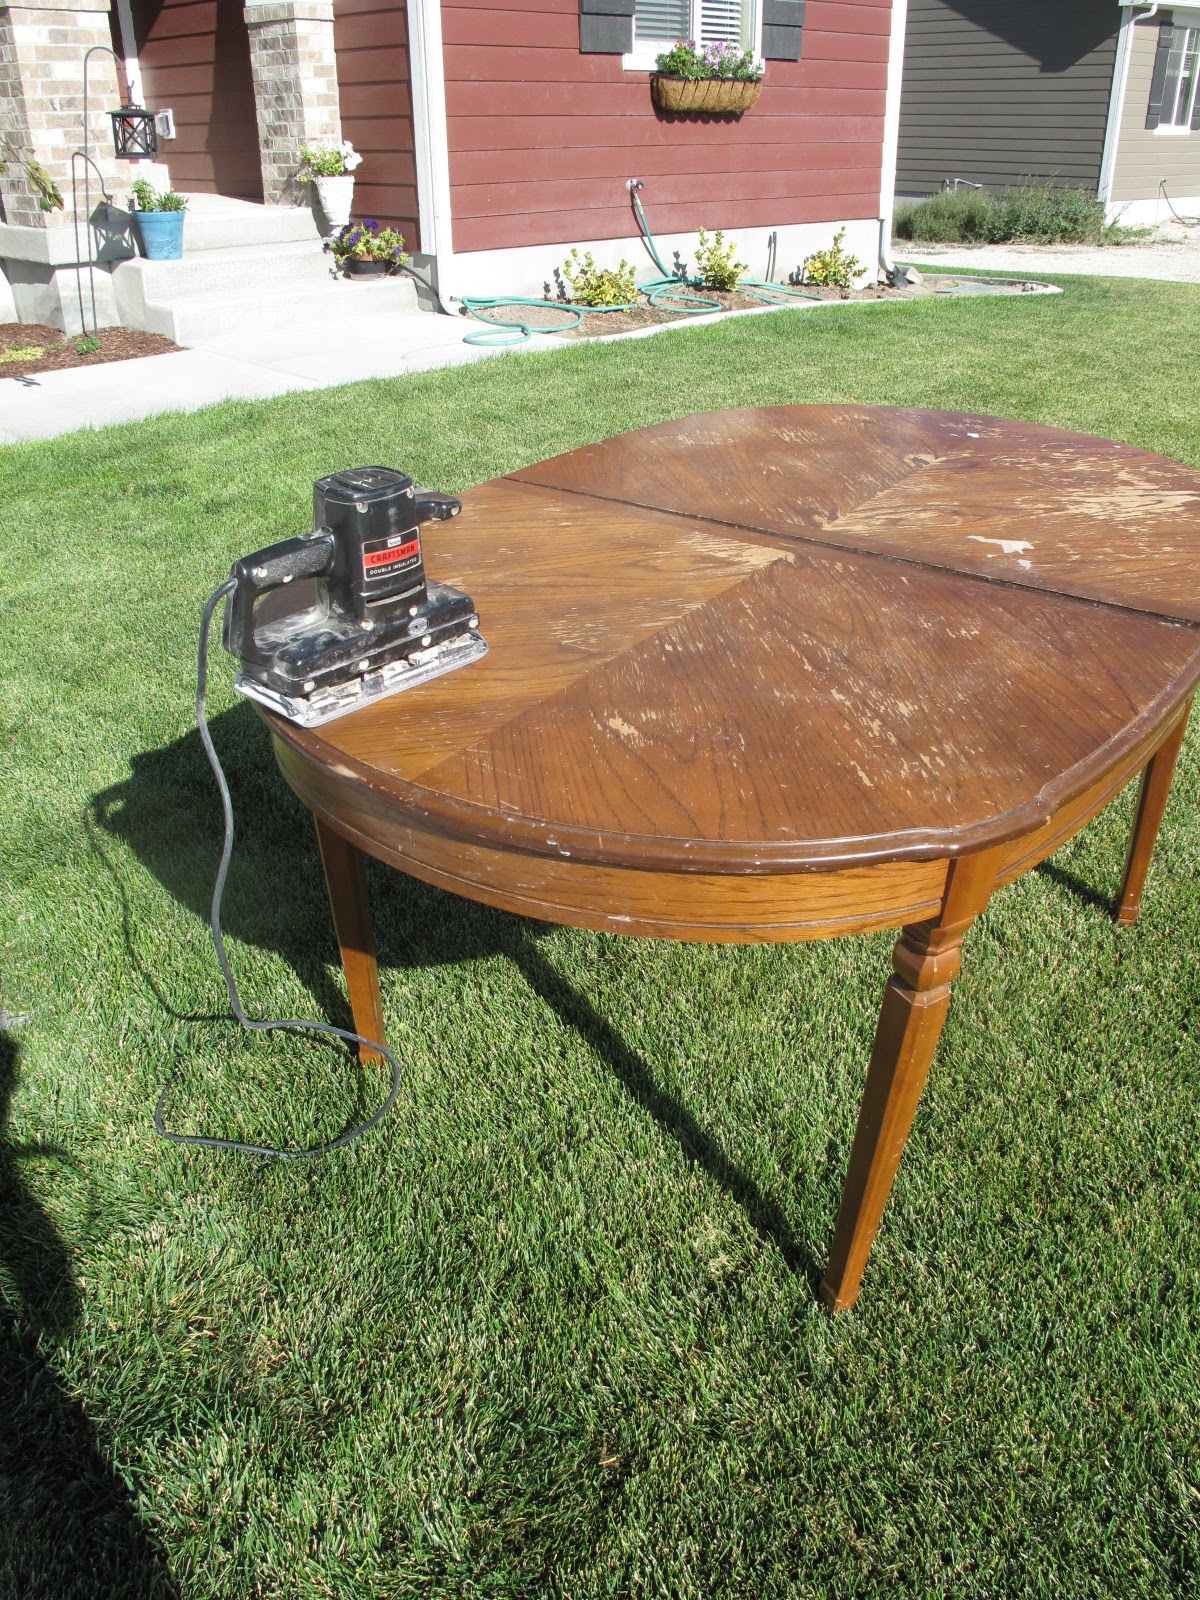
When I saw this dining room set on KSL, I was ecstatic. I have had a vision of the set I wanted in my own kitchen for quite some time but hadn't been able to find the perfect set within my budget. This one would require a lot of work, but I was willing to put in the time.
Here's how I transformed the table:
Supplies used
- Old table in need of some TLC, solid wood
- citristrip stripper
- paint brush
- Husky paint scraper/multi use tool
- lots of patience
- 80 grit coarse sandpaper
- sander
- 320 grit extra fine sandpaper
- Minwax pre-stain wood condition
- Another large dose of patience
- Minwax stain- Dark Walnut and Jacobean
- Annie Sloan soft wax- dark
- Microfiber disc
- Annie Sloan Chalk Paint- Paris Gray and Old White
- Annie Sloan soft wax- clear
- A very large Diet Coke with fresh lime to reward yourself when finished
Directions
1) Stripped the paint
I experimented with several different paint strippers and tools, and hopefully all of my experimentation and mishaps will help you. I found that the best stripper was Citristrip, which can be purchased from Home Depot.
I applied this with a brush on very thickly in the direction of the grain of wood. It worked best in the areas where the stripper was applied most thickly, and will show up orange.
Once it has been applied, I waited approximately 12 hours for the stripper to do it's job. When I tried to remove the paint before or after this amount of time, it was very difficult to scrape off. 12 hours is the magic number. The orange stripper will become white, and occasionally the paint may appear to bubble.
Using a multi-use paint tool (from Home Depot), I scraped the paint off in the direction of the grain. This should not be difficult and should just lift right up.
If it doesn't, wait a little while longer, or apply another layer of stripper and wait 12 hours.
The scalloped edges were a bit trickier and much more time consuming. I used the scraper held at an angle to carefully clean off the paint as best as possible, then finished the rest of it off with a scrub brush dipped in mineral spirits. For more details on how to strip paint, you can refer to a previous post
HERE.
2) Sanded the surface
Using a belt sander on the orbital setting with coarse 80 grit sandpaper, I worked over the full table top in the direction of the wood grain. I followed over it with extra fine 320 grit sandpaper to smooth out any ridges or texture left by the coarse paper. I used my corner cat hand sander with extra fine sandpaper to clean up the rounded edges and carefully get into the crevices.
3) Stained the table top
First, I treated the wood with Minwax pre-stain wood conditioner using a rag, and applying it with the grain of the wood. Once it had dried, I applied a combination of Minwax stain in Dark Walnut and Jacobean.
The stain wasn't as dark as I wanted it, so I continued to apply several layers until it reached the depth that I wanted.
Isn't it looking so rich and lovely?
4) Waxed the table top
Using Annie Sloan Soft Wax in dark color, I applied several light coats with a brush, and buffed in between coats using a microfiber disc for waxing cars (I picked mine up at Walmart for a couple bucks).
Clear wax would have also served the same purpose, but I wanted to still try and get some depth from the dark wax.
You could also use a less expensive clear wax, like Minwax paste finishing wax if your surface is flat and without details. This wax is much more clumpy however, and only works well on flat surfaces. For more information on wax options, I recommend watching the video tutorial from Miss Mustard Seed
HERE.
5) Painted the legs and apron
Using my new stash of Annie Sloan Chalk Paint, I mixed together Old White with a small amount of Paris Gray, and painted right onto the funky textured apron and legs of the table. I didn't sand or prime before and I'm telling you, this paint goes on like butter! It is amazing.
The amazing part is that I only had to apply one coat of paint, even with the dark stain that I had to cover up in places and chipped paint sections.
Although the quarts are small and pricey, they will last you a VERY long time.
6) Lightly distressed the base
Once the paint had dried, I roughed up the high points and edges with a sanding block, allowing for the funky texture hiding underneath to shine through. The disastrous sponge paint mayhem that once was on this table worked in my favor. Often times, you have to just go with the texture of your piece of furniture rather than try to alter it. Usually, it works in your favor.
7) Waxed the base
Using an old brush and Annie Sloan Soft Wax in clear, I lightly covered the surfaces just as I had to the table top and then buffed it all down with the microfiber discs.
*** Note- initially I used dark wax mixed with clear wax to try and obtain an aged look, but I felt like it looked to dirty, so I repeated steps 5-7 again. The dark wax is fabulous for many purposes, but remember to use sparingly when your intention is to create an aged look. ***
Here's how I transformed the chairs:
Supplies
- Small pliers to remove welting
- Annie Sloan Chalk Paint Paris Gray and Old White
- Sanding block
- Annie Sloan soft wax- clear
- Screwdriver to remove seat cushion
- Staple gun
- Bleached canvas drop cloth, refer to tutorial HERE
- Double welting cord
- Scissors to trim away excess fabric
- Sewing machine and thread to make skirts, tutorial HERE
- Magic sliders to protect floors
- Drill to create pilot hole
- Scotchgard fabric protector spray
1) Removed the seat cushions and welting
I unscrewed the seat bottoms so that I could work on the frames without them getting in the way. If I had upholstered the seat cushions, I would have needed to do so at that point when the bases were removed.
Here's a small little cheating secret on how to quickly upholster chairs, when the foam and batting are still in great condition... just upholster over the existing fabric! This saved me hours of time. I simply removed the double welting cord (find the starting point, tug gently and try not to pull the other fabric off with it), and stapled my new fabric right over the top.
*** I did this backwards and painted the frame first, but it would have been easier had I removed the cording first***
2) Painted, distressed, and waxed the frames
I used Annie Sloan Chalk Paint in Paris gray on all 4 armless chairs, and Old White on the 2 captain chairs. I wanted them to really stand out.
After they were all painted, I distressed and waxed them just as I had done to the table legs.
3) Upholstered the seat backs
Using a bleached canvas drop cloth from Home Depot, I upholstered right over the existing fabric. For tips on how to prepare your drop cloth and upholster, please refer to my tutorial series
HERE and
HERE.
The backs of these chairs had initially been upholstered from the inside, so I would have had to remove several layers of fabric, staples, batting, and more fabric to get to the very backs. Instead, I opted to take an easier route by covering the back side with the drop cloth from the outside by stapling onto the inner wooden frame, and then cover up my staples with double welting cord. This too worked in my favor and I think looks much for elegant than they had before.
4) Made skirts for seats
I cannot claim any creativity for this step. I fell in love with the skirts that Miss Mustard made, and copied hers using her wonderful tutorial,
HERE.
5) Finishing touches
Lastly, I screwed the seats back in place, and added protective sliders to the bottom of each chair leg to prevent scraping against our floors. I experimented with several, and the ones that I liked the most were called Magic Sliders from Home Depot. You drill a small pilot hole into the leg, then secure the slider in place with a scew.
These aren't your dinky little felt protectors that come off their adhesive in a week. They are pricier (around $7 for a set of 8) but well worth the investment to protect your floors.
I also sprayed the upholstered fronts and backs with Scotchgard spray to hopefully allow for an easier clean up when we get the inevitable cheetos fingers or spilled spaghetti on the chairs. I didn't worry about spraying the skirts, as they are removable and will get tossed in the washing machine as needed.
I am also having a custom piece of glass cut to sit on top of the table. With all the effort I put in to make that wood look as beautiful as it does, I am not willing to let it get scratched or ruined.
And that, dear friends is how I did it.
Those of you who read this tutorial in its entirety deserve a prize. Go enter the
Annie Sloan Chalk Paint and Wax giveaway that ends tomorrow, August 22.
Please be sure to share with me your transformations. It's never too late to begin...
~PW
I'm sharing this tutorial with
Home Stores A2Z, Tip Junkie, Miss Mustard Seed, The DIY Club, and By Stephanie Lynn. Be sure to check out their parties!