Showing posts with label pillow. Show all posts

Thursday, December 8, 2011

Simple gift idea- DIY Christmas Pillow

I just finished a Christmas pillow that I just finished for a friend.  I love the way that it turned out.  My inspiration came from this fabulous Pottery Barn pillow that I stumbled upon through pinterest.  With a price tag way above my budget I decided to try and make my own version. 


I thought for about 2 minutes about cutting out a billion little felt leaves and hand stitching them on but then I remembered I am not an idiot and didn't want to spend 5 hours doing that.  *** Note to my sensitive readers- I don't think you are an idiot if you choose to go that route.  I'm a very impatient person and I would likely end up pulling my hair out and throwing a tantrum if I started a tedious project like this, so I personally would have been an idiot if I made that choice.  If you're patient enough to handle that kind of a project, my hat goes off to you.  :)  ***SOOOOO here's what I came up with instead to add a little flair and joy of my own.

Turned out pretty cute, right?  Best part about it?  My version cost about 1/10 of the PB price.

Here's what I did:

Following the same steps I shared with you in a previous post HERE, I quickly stitched an envelope pillow case out of bleached drop cloth, then using a cricuit machine, I cut out the word "joy"  on freezer paper and spray painted the stencil onto my pillow using a metallic silver paint (I prefer Rustoleum).

Last, but not least I picked up this darling rosette lace at Joann for about $5/ yard (cheaper with their 40% or 50% off coupon) and placed the lace where I wanted it creating a wreath and securing it in place with pins.  Then, I hand stitched from the back side between every rosette to secure the lace in place, and viola!  After about 30 min total, my pillow was finished and darling. 

Here she is in me living room.  I love Christmas decor that is subtle and still festive without red and green screaming in your face. 


I also made these holiday pillows for the seasonal front porch bench.


I intended to string a row of jingle bells below the "Believe" but just haven't gotten around to it yet.  Maybe I'll get off my lazy toosh and get to that.  Probably not...

Last but not least, I have to give a shout out to my new friend Ashley. She is a new reader who is also the lucky new owner of my latest Chevron chair.  I got to meet her in person last night and she was adorning me with compliments and praise left and right.  I didn't feel at all worthy for it, but she made me remember why I blog.  Thank you Ashley and all who continue to read and support this silly passion of mine.

XO

Penny Wenny

Wednesday, November 2, 2011

Chevron Curtains and a living room update

After much debate over the fabric choices that I shared with you fine folks HERE, I decided to go with one  of my favorite and trusted prints, the blue and antique chevron print from Fabric.com to make extended length curtains for my living room and kitchen.


I bought the fabric on clearance and lined 4 pieces with blackout drapery lining that was also on clearance at Joann's.  It makes the curtains extra thick, and they really do black out any light.  They also help to keep the home more energy efficient. I raised the height of my curtain rods, and opted to use curtain rod hooks for a more airy feel.

I love them.  It's amazing how much bigger the rooms feel with my curtain height extended. 


I've been holding off on showing them to you because my kitchen and living room are still very much in progress, but this way you can enjoy the ride with me.  Here's the status so far.

We added a custom cut glass top to the dining room table that I shared with you all HERE to protect it and to allow for much easier cleanup after each meal.  This investment was so worth it to me.

I treated myself to this darling fork and spoon for my birthday (purchased on sale from Hobby Lobby) instead of my originally planned "EAT" sign above the sink.  I saw them while browsing and decided that a fork and spoon say EAT just as well as the text does. 

I added some small plates above the buffet, and will hang that fabulous silver tray above them soon.  I found that baby for $5 at Salvation Army all tarnished and couldn't believe how gorgeous it was once I polished her up.


The real dilemma in my kitchen right now is the bar stool situation for the island.  That story is going to be reserved for an entire post.  Hold on to your seats, my friends.  Try your best to just ignore what's going in in these pics at the island... :)

In the living room, I basically sold everything that was in there before with the exception of my couch and coffee table.  I wanted to start with a completely blank canvas and build up. 
Here's a few of the living room "before" decor.  I was so done with all the dark colors in the orange/red/
brown tones.


The couch was positioned the other direction, facing towards the large wall where the espresso colored entertainment center was, closing the space off between the kitchen and living room.

Here are the changes we've made so far in this room.

I got this fabulous new rug from my sweets for my bday, and added a few new pillows. 

Don't look too closely at the pillows because many of the "covers" right now are just loose swatches of fabric waiting to be sewn.  You get the idea though, right? I am very aware of all of the geometric print action that's happening, but I think it will all come together once all my pillows are finished (with more prints coming in) and the items that are really going on the wall have been hung.
On the main wall opposite the kitchen, I would like to build a huge custom unit from floor to ceiling with lots of moulding, but my hubbs and I are trying to figure out how to do it ourselves and decide if we're brave/dumb enough to attempt it on our own.  I think we are both. 

This poor space over here is where we currently have everything shoved so that we can still watch sesame street every. blasted. morning.  Yup. 

That's it, friends!  There's the very long version of what could have just been:

"Remember the curtains in these two rooms before?

this is the WAY before shot... like right when we moved in :)


Here they are now!"


Loving you for listening to me ramble on and on when I should be showering/cleaning/grocery shopping/sewing my pillows/choreographing/the list goes on and on forever...

PW

Monday, October 10, 2011

Freezer Paper and Spray Paint Zipper Free Pillows

Yep yep you read it right... in this post I will show you how to make very adorable and very inexpensive pillow covers using freezer paper and spray paint for your pattern or print.

Here are three that are currently adorning my front porch for the Halloween/ fall season.


The front porch still needs some more sprucing up but that's a'comin shortly with some punkins and corn stalks my friends...

So, here's what you'll need:

- A bleached canvas drop cloth (read my post HERE on how to prepare the drop cloth if you haven't already read it)
- Freezer paper (wax or parchment paper won't work... I tried and it failed miserably)
- a sharp razor blade or exacto knife
- spray paint in the color(s) of your choice

Here's how it's done:

First, you need to create your envelope pillow cover.  Please proceed into this next section with caution.  When I sew, I typically just wing things.  I didn't follow an exact template or cut each piece the same every time.  Using another pillow cover as my guide, I cut a piece of drop cloth to be the width of the pillow I was covering plus approx. 2 inches by the length of the pillow x 2.5.  Sooooo, if the pillow you are covering is 20" x 20", your fabric needs to be 22" wide x 50" long... make sense?

Hem each short end of your fabric under. 

I prefer to quickly sew mine, but you can also use stitch witchery if you prefer.  With this product, you cut the stitch witchery to the length of the area you wish to seam together, and then iron the two folds together.


Honestly, it took me longer and didn't look as nice with the stitch witchery.  I'll let you decide, my friends. :)

So at this point you should have two hemmed edges (on the shorter ends of your fabric). Lay the fabric down, right side up facing you (so that the hemmed edges are facing the ground).  Fold one side over approx 1/3" of the width of your final pillow.  For a 20" pillow for example, I folded one side in about 7".

 Next, fold the second side over the top of your first fold to equal the desired length of your pillow (20" in my case). 

see my cute new birthday present peeping out???

 Place a few quick pins in place, and stitch each side so that your final width is the width of your pillow.  If you added 2 inches to your original calculation, sew in 1" on each side.


If you're feeling really wild, you can even surge the edges at this point.  :)  It was 2 am for me and I was too tired so one quick stitch worked just dandy for me.

Fold the pillow cover inside out and viola!  You should have a nice little envelope cover that doesn't require any zipper, buttons, or ties.

Now, onto the fun part.  Using freezer paper, I created my own stencils by tracing images/ other fabric prints and then used a sharp razor blade to cut out the parts I wanted colored.

I traced the chevron pattern from my curtains for one, a black crow from THIS Tag Halloween doormat, and then some leaf stencils for the last one.  If you have a cricuit or similar machine, this would be a FABULOUS time to whip it out and save yourself a lot of time.


Next, place the freezer paper carefully on your pillow cover where you want the images to be placed, shiny side down.   With your iron on medium to high heat (mine is old and ghetto so the hottest temp is perfect), iron the paper onto your fabric, paying careful attention to the cutout sections making sure that the freezer paper sticks well.  If you are lazy here, your paint will bleed through.  Trust me on this one.  I learned the hard way. :)


Finally, cover all of the exposed parts of your fabric that you don't want painted and lightly spray paint over your stencils.  My paint never bled through the fabric, but you may want to put a piece of cardboard or thick cardstock inside the cover to prevent the paint from bleeding through the back side.  Remember not to over saturate the painted area.  It will not appear to be a very deep color when painted onto the nubby canvas material, but it will pop plenty once you remove the stencil. 

the color I used for the rust orange is called Cinnamon by Rustoleum.  I loved it

Allow the paint to dry for at least 10 minutes, then remove your stencil and once again, VIOLA!
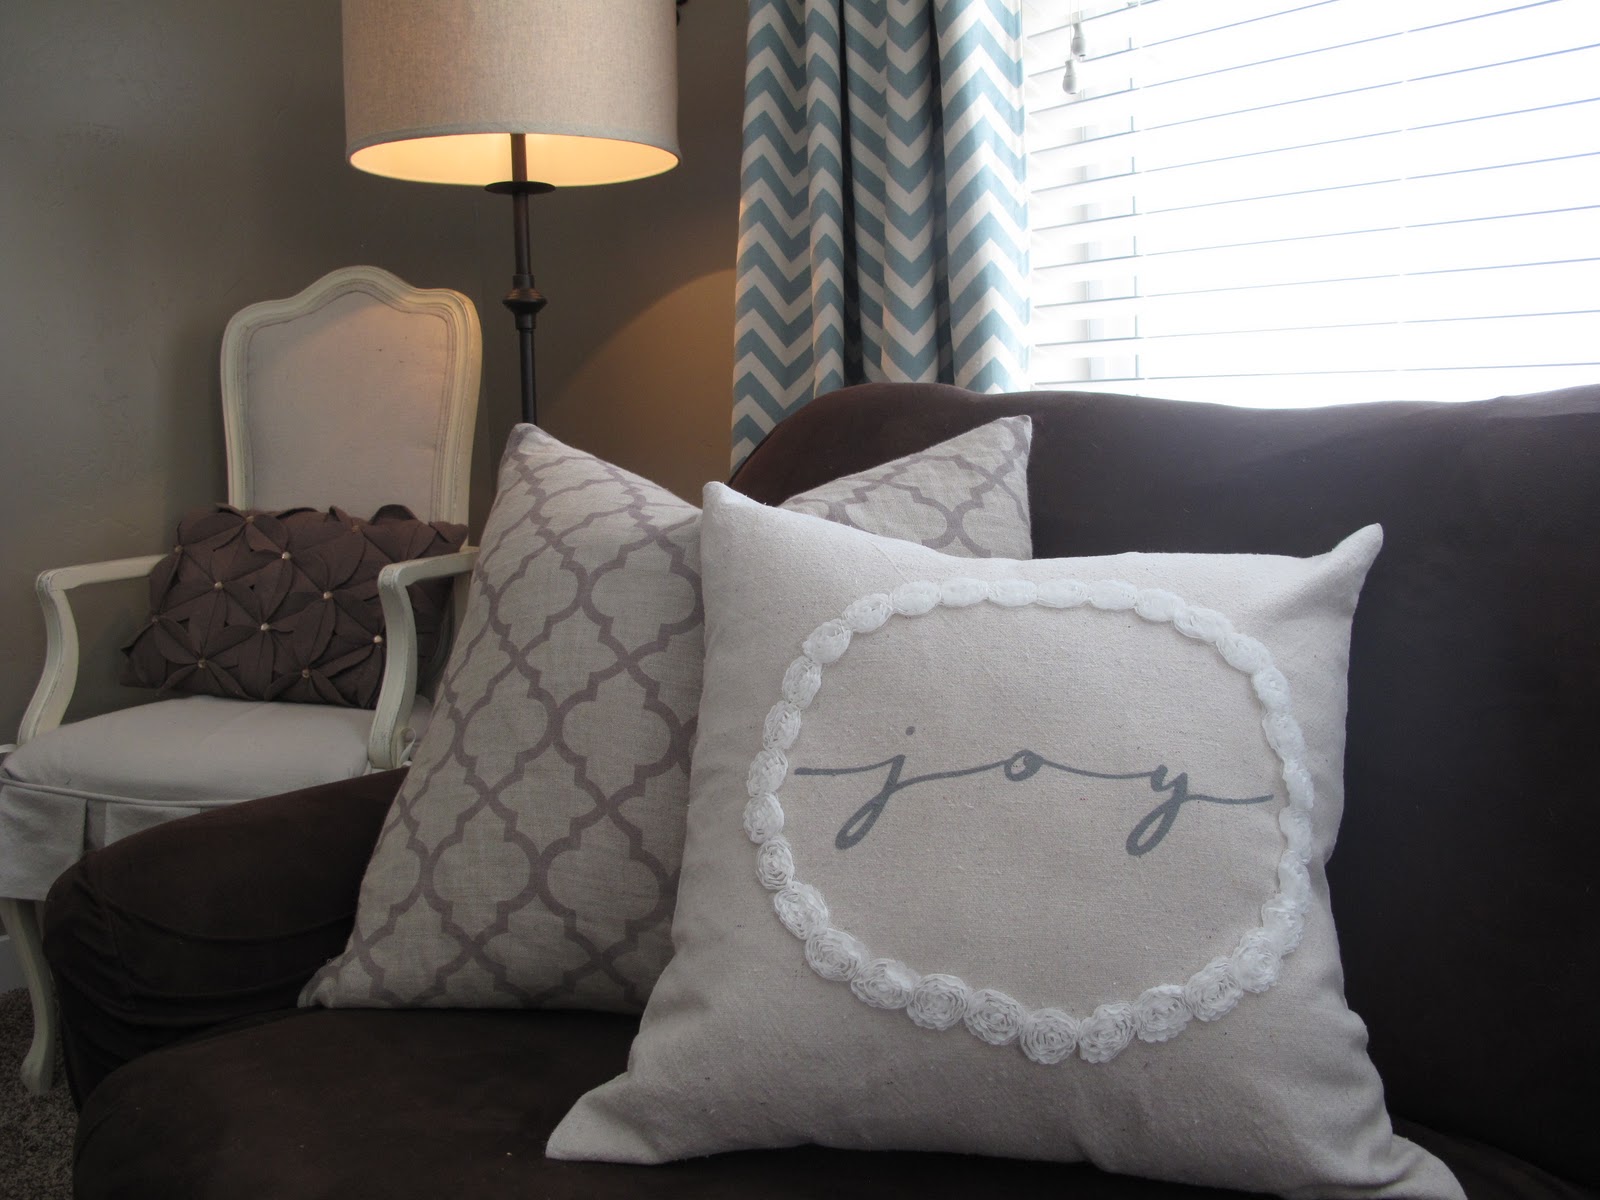
I was skeptical at first with the idea of spray paint on pillows but I can assure you that they look and feel fabulous.  It isn't scratchy, and the paint doesn't rub off at all.  The canvas material is already nubby and natural feeling, so it works perfectly.  You can also use this to create indoor pillows with some fun geometrical shapes or text.  I created this cute little turquoise pillow and my & pillow using the same technique.
Kind of fun, right?  To care for these pillow covers, turn them inside out before putting them on a gentle cycle in the washing machine, and then allow them to air dry.  I'm not so sure how well an iron would work with the paint, so I plan to avoid it all together.

Do you spy my new curtains in the background???  As you can see, I went with my first fabric choice and am SO glad I did.  I will do a separate post on them soon.  With my curtains sewn and my new rug that my sweets gave me for my bday, my family room is finally starting to feel like my style.  I can't wait for it all to be finished.

Also, to end on a sappy note I just have to share the very best part about my birthday this year.  My darling hubby told me (sincerely) that he married me because I make him a better person.  It wasn't a compliment I was seeking for, and he wasn't expecting anything in return (wink wink); he genuinely meant it.  Man, I love that man.

thanks for reading, my friends...

XO

~One-year-older-but-not-much-wiser- Penny Wenny

I'm sharing this tute with the following fabulous parties.  Check them out!

Tip Junkie handmade projects


The Shabby Nest


Photobucket


Domestically Speaking

UndertheTableandDreaming