Tuesday, February 21, 2012

French Yellow Night Stands

It's back, friends... My motivation has returned!  Something about this second trimester of pregnancy has finally brought some of my normal Penny Wenny go go go attitude back.  I couldn't be happier.  I was so annoyed with my lack of interest or desire to work on any projects.  On a side note however, I have also been extremely busy with my real job at the dance studio.  I coach two competition teams there, and we are currently preparing for our upcoming competitions so I'm in crunch mode.  I can't wait to show you the finalized pieces after they have competed... these kids are gonna knock your socks off.

Anyway, please forgive me for my lack of exciting projects over the past few months and bear with me over the unexpected upcoming months.  While I do feel ambitious this week I can't promise I'll feel the same way next week.  Fair enough?

One of the best things about having your friends know that you "do furniture" is that they always call you before they dump off their trash to the DI or Goodwill.  My sweet neighbor gave me two little nightstands a while back and I finally did something with them this week.

They started as an average set of nightstands that looked dated and ready for new life.  I loved their curvy frenchy looking little legs. Typically, I love to highlight dark wooden tops but these are not super high quality and are made of MDF on the top with a super laquered faux-wood grain finish.

So shiny I could almost see myself in it.  :)  I didn't want to spend a lot of money on these, and really just wanted to use products I had on hand so that I could do the project that day when I woke up feeling surprisingly motivated.

I started by priming these babies with Kilz.  I often skip this step if I am using a paint and primer in one, but since the tops were so shiny, I really wanted to ensure a well primed surface for my paint to adhere to.


As a reminder, when working with spray paint you always want to do several light overlapping coats.  Do not try to cover the full surface in one coat or you will end with a big drippy mess.   Also, Kilz leaves a gritty texture so I like to lightly go over the dried surfaces with a fine sanders block to smooth it back out before painting.

Here's where the fun began.  I wanted to go for a color I don't usually do like my standard creams and grays.  I picked up a sunny yellow paint I had aquired in my collection from the oops section at Home Depot for $1.  I didn't want these to be childlike though, and felt that the yellow was way too bright.  I rounded up a brown I had also picked up for $1 from the oops section, and mixed a small amount of brown paint with the yellow in a plastic cup until I had a  nice mustardy yellow.

just in case you didn't believe me on the price...

I brushed on two coats of paint, right over the hardware also.


After the paint dried I lightly sanded over the high points bringing out some of the white from the primer and dark brown from the original wooden finish.


I also sanded lightly over the hardware to expose some of the original brass.

They turned out pretty cute, right?


The total cost for me was $8;  $6 for Kilz, and $2 for my oops paint (which I barely even dented so technically it was around $0.20).  Let me remind you of what my $8 did.

Before:
After:


It doesn't take a lot of $ to make fabulous pieces for your home.  Go for it friends!

~PW

Sunday, February 19, 2012

Inexpensive and easy curb appeal

My sister and her husband have decided to sell their house and upgrade.  They have lived in their home for several years and have just outgrown it with their kids.  I've spent a few days at her place these past few weeks trying to help her make some simple improvements that will help them to sell it faster.  As a huge fan of HGTV's Designed to Sell, this kind of challenge was right up my alley. 

When I first pulled up to the house I knew that regardless of what she had on the agenda for us that day, I was going to try and help her spice up her curb appeal.  After all, if you don't like what you see on the outside of home why on earth waste your time even looking inside? (Or at least that's what the majority of folks think... and I can't blame them)

So, here are a few shots of what my sister's house looked like when I pulled up.

As you can see, the house is screaming for some color.  The front door hadn't really ever been painted but had what looked like an attempted first coat from back in the day that still showed brush marks and was just so wrong in color (or lack thereof).  It just looked dirty and dingy. The doormat was old and faded, the railing was chipping and completely the wrong color.

Another big problem to me was the chipping paint on their front door and garage door trim.  It needed some TLC in a big way.


Also, the trim paint around the garage was a different shade of brown than the trim around the front door and the rest of the home. 

My sister and I decided on a new color for the front door that would give this house a much needed "pop" and ran off to Home Depot.  After coming home and realizing we had left our purchased items at the store (yes, this is what happens when two tired mommy's try to go to a hardware store with 3 very little children), we headed back for the goods and quickly got to work.

Amidst the chaos of trying to keep the kids away from the paint, razor blades and electric sander, I didn't take any pictures in the process.  Forgive me please.  Just try your best to imagine what a pregnant lady on a bar stool painting a wide open door looked like while three kids chased each other inside (and outside) of the house as it began to snow. But, I can tell you what we did. 

My sister started scraping away the chippy pieces of paint from the door trim with a metal putty knife and I followed her with an electric sander to smooth down any rough areas.  Then, we cleaned the door really well and removed the doorknob.  With the door still on it's hinges and wide open I began cutting in carefully with a paintbrush around all of the edges and on the door panel recesses that the roller would not be able to reach.  We chose Behr's Ultra exterior paint and primer in one to save the hassle of having to prime the door first.  Then, I rolled the paint onto the door while my sister brushed on the new and fresh paint on the door trim.

By the time I left that evening, the door had received its second coat of paint and was still drying before the hardware could go back on.  Since a new door handle wasn't in the budget, she took the old and dated brass one off and hit it with a few coats of black spray paint. 

The next day, my mom went out and together they finished the other items on our agenda.  She repeated the same process around the garage door with the trim, and together they spray painted the dingy looking railing black. 

With a new wreath, doormat, and a few accessories here is my sister's fabulous front porch now.


***note- we also added a cute mustard yellow and white polka dot ribbon to the wreath for more lively color.  You can't tell in this pic, but her doormat has some darling red poppies with yellow accents so it works fabulously together. ***

Here's how the house looks from the street now. A bit more inviting, right?

In case you have forgotten what it looked like before, let me remind you.
And here she is now!

Isn't it amazing how much a little paint and some TLC can change things?  My sister's only regret?  Wishing she would have done this all sooner...

Total cost for this transformation: $116
$36 for 2 quarts of paint, red for the door and brown for the trim
$80 for wreath, doormat, and lantern
already on hand- black spray paint and all other supplies

My dear friends remember that your home is your castle and should be a place that is welcoming, inviting, and makes you feel peaceful.  You don't have to break the bank to create a place that you will love.  Go for it!  Make the change today...


~PW

Saturday, February 11, 2012

Food Saver for Freezer Meals

I recently received one of the best gifts ever- a FoodSaver.  I've never had or used one before, so I didn't realize what I was missing.  If you've never used one either let me tell you, you're in for a treat.
The gift arrived in perfect timing as I had just finished up another round of freezer meals with my sisters.  For new readers, we do this every few months and stock up our freezers full of delicious, homemade dinners for our families.  We average about $6/meal, and when I say meal I mean really good food- we're not talking hot dogs and noodles folks.  For more info on how to start making your own freezer meals, catch up on my tips and some recipes HERE.
Typically I pack up my freezer meals in a zip loc bag, lay them out flat to freeze and then stack them neatly in the freezer.  This doesn't work for everything however, like the casserole/enchilada/lasagna recipes.  Here's how I used my new FoodSaver to 1) store my food in airtight bags that will last longer without freezer burn, and 2) save me the mess later of having to wait for my meal to thaw enough to remove the saran and foil before I drop it in the pan.

Step one: Seal one end of the FoodSaver roll (unless you are using FoodSaver bags, which will already be sealed shut on one end)
Line up one end of the roll against the sealing strip,
 close the lid and lock it in place,

press the "seal" button and wait with anticipation,

and voila, one end is sealed.

Step two: Cut your bag to size

I found that the easiest way to do this was simply to hold the bag over my freezer meal, and then eyeball an additional 3 inches to the length of my meal.

Step three: Seal the deal

If desired, label the top before you seal it as it will be easier to do this with a flat surface before the food is inside. I quickly wrote the name of the meal, and cooking instructions.

Place your food in the bag, leaving at least 3 inches of space from the food to the top (unsealed end) of your bag. 


Tuck the top end into the vacuum chamber, close and lock the lid, and press the "vac/seal" button.


Watch in awe as this awesome machine sucks out all the air and gives you this cute little package in the end.


A few tips if you would like to use a FoodSaver to freeze meals like freezer meals, or your excess leftovers.  First, you really need to pre-freeze the meal.  The FoodSaver pulls excess liquid out, so if you were trying to freeze soup for example, you're going to a lose a lot of the meal.

With most of my meals, I froze them in the dishes I plan on using later to bake them in, then removed them from the dish once frozen and sealed them in their frozen state.

 When I'm ready to use the meal, I remove the frozen meal from the sealed bag and set it in the dish to thaw until it's time to cook.

To save a step, you can also put the meal right into a foil pan, and after freezing it you can seal it up right in the foil pan that you will cook it in.  It bends the shape slightly when it vacuums the air out, but not enough that it's going to hurt anything.

Here is my cute little finished stack of freezer meals all vacuum sealed and ready to store!


Did I mention how much I love this new gadget?  I can't wait to start storing my chicken and meats I buy in bulk with the FoodSaver bags in my freezer.

Do any of you have any tips on other things I might get excited about using the FoodSaver for?

~PW

Saturday, January 14, 2012

Ottoman revamp and a new light

Hello, friends.  I've been meaning to share with you for a while a few updates we made in our master bedroom, but the sad truth is that I've been to lazy to clean my room to photo-worthy standards so that I could actually share with you the updates.  Those first 12 weeks of pregnancy really stole all of my motivation.  I am pleased to say that I finally feel (sort of) like a real live human being again.  Definitely not my crazy-always-has-to-be-doing-something self, but at least alive.

Here's a recent shot of my master bedroom.


Observant eye balls will notice the new ottoman at the foot of our bed, and the new hanging light fixture.  Really observant eye balls will notice that I most certainly did not iron my bed skirt when I cleaned my room for the pics.  Crap.

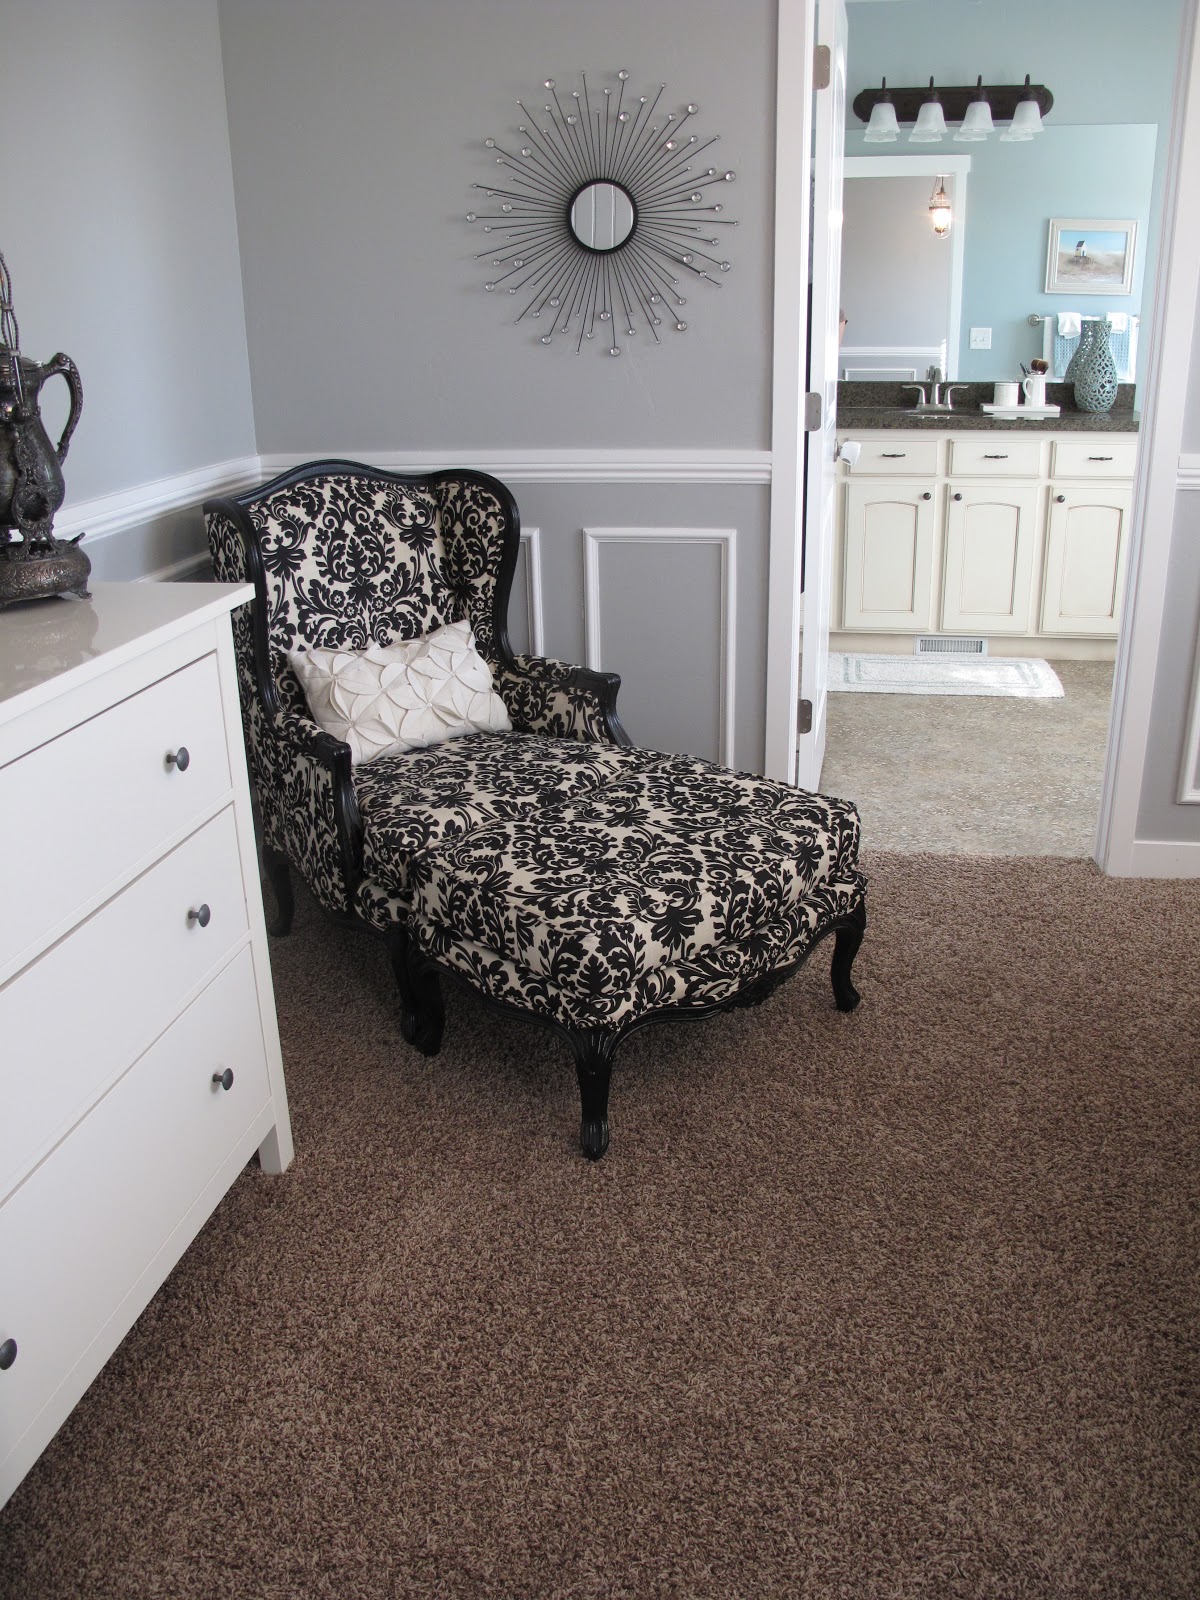
I finished my wingback chair a while back, as one of my first ever reupholstery projects.  Here's how she looked then, with my scary blue walls in the bedroom.


I didn't have the budget to replace the foam at that point, so it sat there with a saggy cushion for a long time.  I finally got the time, cash, and bravery to finish the seat cushion properly with new plump foam and a Dacron wrap and reupholster the ottoman.

Here's the much beefier seat cushion in my much calmer colored bedroom now.


It feels much better so sit on these days also.

Here's what the ottoman to this chair looked like when I originally picked it up at a thrift store.

Why didn't I just keep the original fabric?  It would have been so perfect in my bedroom... oh dear.

So here is that cute little ottoman now that I finally finished it, reunited again with its mate.


As you can see the ottoman slightly blocks the path to our bathroom, so unless I am reading or want to kick my feet up on the chair the ottoman resides here as a foot of bed bench.

I kinda like it.

Also, I found this steal of a deal at Home Depot on a lantern style hanging light fixture.  I saw one lurking out from behind another light with a clearance sticker, and had to take it with a price tag of $60.


Slowly but surely, the little additions to our bedroom are making it a complete space.  I still need to decide on my decor to fill this wall, but other than that it's almost done!

Any suggestions? 

~PW

Wednesday, January 11, 2012

Thrifty kicks

Most of my readers know that I love me a good bargain.  And by bargain I mean virtually free.  It's kind of a problem actually.  Anytime I consider a purchase, I usually find myself saying no because I could either make it myself, or buy it thrifted from someone who gave it away virtually brand new.  Does anyone have a cure for this???

I've mentioned before that the DI (Deseret Industries) by my house is a goldmine.  I have found some incredible steals there. 

This week, I stumbled upon three pair of shoes for a total of $11.

This sassy little set of Via Spiga pumps caught my eye and reeled me in with it's hefty price tag of $5. 

 I'm pretty sure these shoes have never been worn. The soles are untouched.

 I also scored on these darling little baby cowboy boots.  They are leather, and in amazing condition.

A whopping $3.  I'm saving these for Travis' little sister (please be a girl, please be a girl...)


Travis didn't go home empty handed either.  We found these leather cowboy boots in his size.


Once again, a whole $3 splurge.

He had fun running around in them playing cowboy with his best bud today.  Yes, we sometimes stay in our jammies all day.  Don't judge.

If you think you just don't have any luck when you thrift, think again.  I visit my DI on average at least once a week and I certainly don't find something every time.  I have a quick run in/ run out system down where I browse the furniture and shoes in about 5 minutes, and every once in a while I'll take the time to look through the kids clothing and home decor/plates/linens/ etc.

One of my favorite finds to this day is this pair of mustard brown leather boots that I walked out with for $6.

Are you ready to run out to your local DI/ thrift store?

~PW