Sunday, November 21, 2010

Fabulous French Bread

The Nutcracker performance is over! It was a really great night. All of the hard work paid off for sure. I was so proud of my students and think/hope that the audience was entertained. I'll post pics/video once the videographer is finished.


Perhaps the best part of the hard work was when I finally went to sleep last night... had one of those deep sleeps where you don't remember falling asleep, don't remember dreaming, and wake up feeling like you just closed your eyes 2 minutes ago. It was amazing. I also enjoyed a 2 hour nap today... no interruptions. Yup. I feel like a new woman.


Our cute neighbors invited us over for dinner tonight, so I baked some of Aunt Janet's famous french bread to take with us. This recipe is super easy, even for learners, and fairly quick in the bread world. This recipe makes 4 very large loaves, so I often halve the recipe and bake 4 smaller loaves, or you can freeze the bread to pull out for later meals (french dip sandwiches, paninis, stuffing, etc).


Aunt Janet's French Bread


1/2 cup sugar
4 tsp salt
1 quart (4 cups) hot water
1/4 cup vegetable oil
12 1/2 cups flour (preferably bread flour, but I use all purpose and it's still great)
2 TBS yeast dissolved in 1 cup lukewarm water


Mix sugar, salt, oil, and hot water in mixer (ideally a bosch). Add half the flour. Add the yeast mixture and stir. (At this point I swap out the beaters for my bread hook.) Add remaining flour and mix. Knead the dough well with the bread hook attachment for 2 minutes. Place dough in large greased bowl and let rise until double in size.


Punch down and divide into 4 equal pieces. Roll each piece out into a rectangle, and then roll into a long loaf and tuck the ends under.
Place 2 loaves on each cookie sheet and and let rise for another 1/2 hour. Make a few slits in the top of the loaf with a sharp knife.

Bake at 350 for 30 minutes.


Enjoy!

Wednesday, November 17, 2010

Nutcracker, Mice, and Damask

Yes you read the title correctly. Those three lovely things have kept this little Miss Penny Wenny extremely busy this past week, hence no posts. Believe me, there has been plenty to blog about but no time. This one will be short and sweet...

1) Nutcracker. The studio where I teach is putting on a production of The Nutcracker this weekend. We have been preparing for this for several months and I am going to be sooo excited when it is over. It has been a lot of work. I choreographed the Russian and Arabian dances, as well as 3 jazz/lyrical numbers for the "pre-show". I am not one of those on the spot choreographers who can come up with brilliant improv work. I take my sweet time for the "inspiration" to come. Needless to say, I was a bit stressed choreographing 5 numbers at once. We had our first dress rehearsal on Saturday, and suddenly all of that hard work paid off. My students did so great! I can't wait to see the full thing this Sat. If you live near SLC and would like to come, please email me for details.

2) MICE! Ugh. I get chills just writing the word, let alone having one climb out of my toaster. Yes, that's right. To make a long and very disgusting story short, we have had several furry little friends join us in our abode over the past few weeks, and I have been continually catching them with traps at night but still freaking out any time I saw them scurry across the floor. I lost it when I heard noise coming from my toaster and after slowly approaching it (hoping that what I thought would be there wouldn't really be there) two little beady eyes peeped out at me and we both freaked out. The mouse ran out across my counter tops and jumped onto the floor behind the fridge. I caught him with a trap that night. His friend who made the same cameo the next night however (in the toaster again) has not been caught.

I called our builder over tonight and we discovered a very large (a sq. foot maybe?) hole underneath our stairs in the garage exposing our basement. I am sure that's how the nasty critters have been coming in to our free Bed and Breakfast. I was less than thrilled with our builder for missing such a small little error (ahem...) but was impressed that the foreman stayed to fix the hole. He was really embarrassed. The only good thing I have taken away from this experience is that my kitchen got a DEEEEP clean today- we're talking stove out, fridge out, all pots and pans out, pantry emptied, etc. etc, clean. Spent 3 hours finding traces of the mouse droppings. It was so revolting but so gratifying knowing that I was getting rid of it all. Please keep your fingers crossed for us that the patched up hole will prevent any more friends from coming in and that toaster boy #2 is toast tonight...

3) Damask. My gorgeous French Wingback Chair is being transformed as we speak. I know it spoils the surprise to show pics in the process, but I just have to! I actually wanted to start crying when the first piece of fabric was stapled in place because it just looks so perfect. It is exactly what I had envisioned. There is still a lot of work to be done, but I can do it (post Nutcracker).
Mice, anyone?

Tuesday, November 9, 2010

Wish I had a girl...


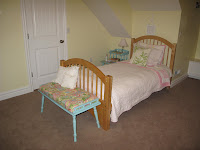
I set these little beauties up at my dear friend Kathie's house tonight for their photo shoot (a very amateur photo shoot if you can't tell from my pictures...), and in walked her darling daughter who is one of my dance students. She sighed immediately and said "I love these! I wish they could stay in our room." If I hadn't spent so much $ on the materials for these babies I seriously would have left them right then and there for her.

But seriously, if only I had a girl. You had better believe they would become the theme to decorate her bedroom around.

Do you likey?

Tuesday, November 2, 2010

Foot of Bed Bench and Nightstand Transformation


I am SOOO excited to write this post because it means one really great thing... I am finished with one more project that has been ongoing for so long! Hallelujah! This particular project has actually been very fun and I love the end result. I only wish I had somewhere to put it in my own home :(

I fell in love with this cute little guy at the DI a while back but thought the price tag was a bit hefty ($15). Yes, I am cheap. I kept eye balling it each time I went back and after it had been there all alone for 2 weeks, I talked to the manager expressing my love for the piece but unwillingness to pay full price. He was thrilled to have someone willing to take it off his hands and dropped it down to $6. That's right, $6 for a solid wood bench with lots of character and charm (at least that's what I saw).

I knew it was fate the next week when I saw this adorable vintage-style night stand sitting all alone for $4. It was a match made in heaven for my bench!


Here is a quick recap of how this project went down:

1- I lightly sanded the pieces to remove the previous polyurethane and any blemishes.
2- I primed each piece with several light coats of Kilz original spray primer.
3- I painted each piece with several light coats of Krylon Blue Ocean Breeze spray paint in gloss.

4- I glazed each piece with Valspar antiquing glaze.
5- I sprayed each piece with several coats (with sanding in between) of MinWax Polyurethane spray in gloss.

At this point I was already in love but really wanted to upholster the bench to go at the foot of a bed (ideally in a little girl's room). After much debate (and your helpful votes) I chose a fabric that I loved, "Breeze Blue Sky" by P Kaufmann, sold through Joann (regularly $40/yard but got it on sale for $20... note: you have to purchase a minimum of 1 yard fabric when purchasing special order fabrics from Joann. I thought I only needed about 1/2 yard, but was very glad I was forced to buy a full yard. You will soon see why.)

I began the fun upholstery portion of the project:

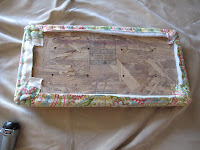
1- I cut a piece of 1/2" wood (I might have had my sweets do this part) to the dimensions I wanted for this bench. Keep in mind that the foam, batting and fabric will add about 1/2" on each side. I also drilled holes with a 1/2" drill bit for the tufting I would do after the cushion was upholstered.
2- I cut a piece of 2" foam to the exact dimensions of the wood with a serrated knife.
3- I cut the batting and fabric to size adding 12" on each side (total 24" to the width and 24" to the length).
4- I layered the pieces on top of one another, beginning with the fabric face side down, batting, foam and lastly the wood.


5- Using my awesome pneumatic staple gun (birthday gift), I stapled the batting and fabric to the bottom side of the wood. I have found the most success if you begin your staple in the center of one side, pull fabric taut and staple in the center on the opposite side. Repeat the same process on the opposite sides of the wood, and continue process working your way out towards the corners pulling taut constantly as you go. Corners are still a challenge for me and I am certainly no master but here's what has worked best for me. I staple as close to the corner as possible, pulling tightly to ensure that all extra fabric is in the very corner. Once last staples are in place, I create a fold with the extra fabric and staple it down like this:


I followed instructions for tufting from one of my all time fave sites, All Things Thrifty, found HERE

Lastly, I secured the upholstered cushion in place with screws underneath the bench. Viola!

With the leftover fabric, I decided to decoupage the night stand. I found some great instructions here:
These are not great pictures but I was too excited to post this. I'm setting them up in my friend's daughters' bedroom for a mini photo shoot "on scene" and will post those soon.


If you are interested in purchasing this set, please email me: LittleMissPennyWenny@gmail.com

Are you ready to create some new furniture for your casa?